A canvas is a window that manages its child windows. Different canvases provide a range of support, including the following:
With the canvas classes, you can build windows with multiple child controls that contain fixed-size areas, user-sizeable areas, and scrollable areas. In addition, a canvas control lets you control tabbing between child controls, providing an alternative to using dialog boxes.
Generally, you build a complex window with a canvas control as the client area. This canvas can contain other canvas controls to build the desired layout.
The canvas classes are:
The set and multicell canvases automatically size and position their child windows for you, based on the child window's minimum size.
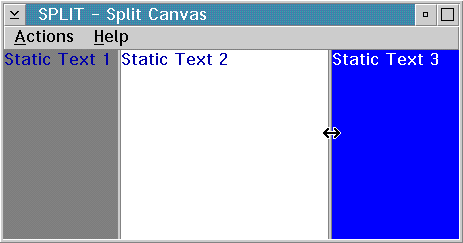
A split canvas places its child controls into panes. The panes are separated by movable or fixed split bars. (The default is movable split bars.) A split canvas can have its split bars oriented vertically or horizontally.
| Note: | In Motif, you can only move the split canvas using the small square buttons. However, in Windows and OS/2, you can move a split canvas using any part of the split bar line. |
Use a split canvas to contain controls that can be resized to display more information, such as list boxes, containers, MLEs, and notebooks.
| Note: | Use the IListBox::noAdjustPosition style on a list box control in a split canvas because, otherwise, the operating system may adjust the height of the list box so it will not fill the height of the split canvas. |
The order in which you create the child controls determines both their relative position on the split canvas and the order in which tab and cursor keys switch focus between them. For a canvas with vertical split bars, the child controls are arranged with the control that was created first in the leftmost pane. For a canvas with horizontal split bars, the control that was created first is placed in the top pane.
The following example shows you how to create a split canvas.
/***********************************************************/
/* MySplit class - split canvas class and associated       */
/* controls                                                */
/***********************************************************/
class MySplit : public ISplitCanvas {
  public:
    MySplit(unsigned long winId, IWindow* pParent);

  private:
    IStaticText  statTxt1;
    IStaticText  statTxt2;
    IStaticText  statTxt3;
};

/***********************************************************/
/* Command handler declaration                             */
/***********************************************************/
class ACommandHandler : public ICommandHandler {

public:
  ACommandHandler(AppWindow *asplcan);

protected:
  virtual bool command(ICommandEvent& cmdEvent);

private:
  AppWindow *splcan;
};

/***********************************************************/
/* AppWindow class declaration                             */
/***********************************************************/
class AppWindow : public IFrameWindow
 {
  public:
    AppWindow( unsigned long windowId);
    ~AppWindow();
    AppWindow & updateCanvas(unsigned long eventtype);

  private:

    ITitle           *   title;
    MySplit          *   splitCv;
    ACommandHandler  *   commandHandler;
 };
/***********************************************************/
/* Window constructor                                      */
/***********************************************************/

AppWindow :: AppWindow( unsigned long windowId)
   : IFrameWindow(windowId,                 // create Frame window
                  defaultStyle() | menuBar)
{

//**********************************************************/
// Create title                                            */
//**********************************************************/
title = new ITitle(this,PSZ_OBJECT,PSZ_VIEW);

//**********************************************************/
// Create split canvas                                     */
//**********************************************************/
splitCv = new MySplit(ID_SPLIT, this);
setClient(splitCv);

//*********************************************************
// Create command handler
//*********************************************************
commandHandler = new ACommandHandler(this);
commandHandler->handleEventsFor(this);
}

/***********************************************************/
/*          TestWindow Destructor                          */
/***********************************************************/

AppWindow :: ~AppWindow ()
{
   commandHandler->stopHandlingEventsFor(this);
   delete title;
   delete splitCv;
}


/***********************************************************/
/*            Perform Menu Events                          */
/***********************************************************/
AppWindow & AppWindow::updateCAN(unsigned long eventtype)
{
   switch (eventtype)
   {
      case ID_VERT_ITEM:
          // Change to vertical orientation
          splitCv->setOrientation(ISplitCanvas::verticalSplit);
          splitCv->refresh();
          return (*this);

      case ID_HORIZ_ITEM:
          // Change to horizontal orientation
          splitCv->setOrientation(ISplitCanvas::horizontalSplit);
          splitCv->refresh();
          return (*this);

      case ID_DOUBLE_EDGE_ITEM:
          // Double the split bar edge
          {
            unsigned long thickness;
            thickness = splitCv->splitBarThickness(ISplitCanvas::splitBarEdge);
            splitCv->setSplitBarThickness(ISplitCanvas::splitBarEdge, thickness*2);
            splitCv->refresh();
            return (*this);
          }

      case ID_HALVE_EDGE_ITEM:
          // Halve the split bar edge
          {
            unsigned long thickness;
            thickness = splitCv->splitBarThickness(ISplitCanvas::splitBarEdge);
            splitCv->setSplitBarThickness(ISplitCanvas::splitBarEdge, thickness/2);
            splitCv->refresh();
            return (*this);
          }

      case ID_DOUBLE_MIDDLE_ITEM:
          // Double the split bar middle
          {
            unsigned long thickness;
            thickness = splitCv->splitBarThickness(ISplitCanvas::splitBarMiddle);
          splitCv->setSplitBarThickness(ISplitCanvas::splitBarMiddle, thickness*2);
            splitCv->refresh();
            return (*this);
          }

      case ID_HALVE_MIDDLE_ITEM:
          // Halve the split bar middle
          {
          unsigned long thickness;
          thickness = splitCv->splitBarThickness(ISplitCanvas::splitBarMiddle);
          splitCv->setSplitBarThickness(ISplitCanvas::splitBarMiddle, thickness/2);
          splitCv->refresh();
          return (*this);
          }

   } /* end switch */
   return (*this);
}


/***********************************************************/
/*            Construct the Command Handler                */
/***********************************************************/
ACommandHandler::ACommandHandler(AppWindow *asplcnv)
{
  splcan = asplcnv;
}


/***********************************************************/
/*            MyWindow Command Event Handler               */
/***********************************************************/
bool ACommandHandler :: command(ICommandEvent& cmdEvent)
 {
   switch (cmdEvent.commandId())
   {
      case ID_VERT_ITEM:
      case ID_HORIZ_ITEM:
      case ID_DOUBLE_EDGE_ITEM:
      case ID_HALVE_EDGE_ITEM:
      case ID_DOUBLE_MIDDLE_ITEM:
      case ID_HALVE_MIDDLE_ITEM:
       splcan->updateCAN(cmdEvent.commandId());
       break;
       return true;
   }
   return false;
}

/***********************************************************/
/* MySplit constructor                                     */
/***********************************************************/
MySplit :: MySplit(unsigned long winId, IWindow* pParent)
 : ISplitCanvas(winId, pParent, pParent),
   statTxt1(ID_TEXT1, this, this),
   statTxt2(ID_TEXT2, this, this),
   statTxt3(ID_TEXT3, this, this)
{
   setSplitWindowPercentage(&statTxt1, 20);
   setSplitWindowPercentage(&statTxt2, 40);
   setSplitWindowPercentage(&statTxt3, 40);
   statTxt1.setText(PSZ_TEXT1);
   statTxt2.setText(PSZ_TEXT2);
   statTxt3.setText(PSZ_TEXT3);
   statTxt1.setBackgroundColor(IColor::kRed);
   statTxt2.setBackgroundColor(IColor::kWhite);
   statTxt3.setBackgroundColor(IColor::kBlue);
   statTxt3.setForegroundColor(IColor::kWhite);
}
/***********************************************************/
/* Construct the command handler                           */
/***********************************************************/
ACommandHandler::ACommandHandler(AppWindow *asplcnv)
{
  splcan = asplcnv;
}

/***********************************************************/
/* MyWindow command event handler                          */
/***********************************************************/
bool ACommandHandler :: command(ICommandEvent& cmdEvent)
 {
   switch (cmdEvent.commandId())
   {
      case ID_VERT_ITEM:
      case ID_HORIZ_ITEM:
      case ID_DOUBLE_EDGE_ITEM:
      case ID_HALVE_EDGE_ITEM:
      case ID_DOUBLE_MIDDLE_ITEM:
      case ID_HALVE_MIDDLE_ITEM:
       splcan->updateCanvas(cmdEvent.commandId());
       return true;
   }
   return false;
}
The following figure shows the split canvas created by using the preceding example:

The following examples show how to create a window containing two split canvases. Each pane is occupied by a static text control.
| Note: | Member functions are initialized in the order that they appear in the class declaration. |
#include <iframe.hpp>                            // IFrameWindow #include <istattxt.hpp>                          // IStaticText #include <isplitcv.hpp>                          // ISplitCanvas class ASplitCanvas : public IFrameWindow {   public:     ASplitCanvas(unsigned long windowId);        // Constructor   private:.
    ISplitCanvas  horzCanvas,              // The canvases will be created
                  vertCanvas;              // in the same order they
    IStaticText   lText,                         // are declared.
                  rText,
                  bText;
};
 1 ASplitCanvas :: ASplitCanvas( unsigned long windowId )
 2   : IFrameWindow( windowId )
 3   , horzCanvas( WND_CANVAS, this, this )
 4   , vertCanvas( WND_CANVAS2, &horzCanvas, &horzCanvas )
 5   , lText( WND_TXTL, &vertCanvas, &vertCanvas )
 6   , rText( WND_TXTR, &vertCanvas, &vertCanvas )
 7   , bText( WND_TXTB, &horzCanvas, &horzCanvas )
 8 {
 9
10   horzCanvas.setOrientation( ISplitCanvas::horizontalSplit ); //Give the canvas
11   setClient( &horzCanvas );          //a horizontal split bar
12                                      //and make it the client area
13
14   vertCanvas.setOrientation( ISplitCanvas::verticalSplit );//Give the canvas
15                                      //a vertical split bar
16   lText.setText(STR_TOPLEFT);        //Set top left static text
17   lText.setAlignment( IStaticText::centerCenter );
18
19   rText.setText(STR_TOPRIGHT);       //Set top right static text
20   rText.setAlignment( IStaticText::centerCenter );
21
22   bText.setText(STR_BOTTOM);         //Set bottom static text
23   bText.setAlignment( IStaticText::centerCenter );
24
25   setFocus().show();                 //Set focus and show window
26
27 } /* end ASplitCanvas :: ASplitCanvas(...) */
Lines 1 through 7 create a canvas with horizontal and vertical
split bars.
The canvases are created in the same order they were declared in
the header
file. In line 4, the vertical canvas is defined as a child of the
horizontal
canvas.
Lines 10 and 11 make the horizontal canvas the client window.
Line 14 defines a canvas with vertical split bars.
Lines 16 through 23 set the text for each static control and position the text in each pane.
The following figure shows the completed split canvas:

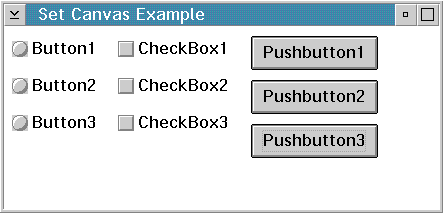
A set canvas arranges its child controls in either rows or columns. The Open Class Class Library uses the term deck for either a row or column. You can arrange the decks of a set canvas either horizontally or vertically. The set canvas attempts to place the same number of controls in each deck.
Each deck is created large enough to contain the largest control in the deck. To do this, the canvas calls the minimumSize member function for each child control. For controls that have sizes defined by the text they contain, such as push buttons and radio buttons, this default processing is normally sufficient. However, for a control that does not have a well-defined size, such as a list box or multiline edit control, you need to set its minimum size by overriding the calcMinimizeSize member function or by calling its setMinimumSize member function before adding it to the set canvas.
| Note: | Your application can determine the best
minimum size for list boxes, multiline edit controls, containers, and frame windows. |
The order in which you create the child controls determines their positions on the set canvas and the order in which tab and cursor keys switch focus between the controls. Several styles are available to control the orientation of the decks and the placement of controls within the decks. You can also alter the spacing between controls and between the decks and the edge of the canvas.
The following example shows you how to create a set canvas. This sample demonstrates the use of horixontal and veritical decks.
/******************************************************************************/
/* Class   : AButtonHandler                                                   */
/*                                                                            */
/* Purpose : this is the select handler for the radio buttons.                */
/*           The button handler is called when a radio button is selected.    */
/*           It displays the number of the button in the static text that     */
/*           is given to it using useInfoArea member function.                */
/*           AButtonHandler is derived from ISelectHandler                    */
/******************************************************************************/
class AButtonHandler : public ISelectHandler
{
public:
   AButtonHandler() : output(0) {;}
   useStatus(IStaticText * pstatus) { output = pstatus; }
protected:
bool
  selected      ( IControlEvent& evt );
private:
    IStaticText   * output;
};

/******************************************************************************/
/* Class   : ASetCanvas                                                       */
/*                                                                            */
/* Purpose : main window for set canvas sample                                */
/*           the window has a split canvas as the client area.                */
/*           Three other controls are added to the split canvas. A static     */
/*           text control is added in the top pane, the lower two panes       */
/*           contain set canvases.                                            */
/*           ASetCanvas is derived from IFrameWindow                          */
/******************************************************************************/
class ASetCanvas : public IFrameWindow
{
  public:
    ASetCanvas(unsigned long windowId);                   // constructor
   ~ASetCanvas();                                         // destructor

  private:
    ISplitCanvas    clientCanvas;
    IStaticText     status;
    ISetCanvas      vSetCanvas,
                    hSetCanvas;
    IRadioButton  * radiobut[NUMBER_OF_BUTTONS];
    AButtonHandler  buttonHandler;
};
/******************************************************************************/
/* ASetCanvas :: ASetCanvas - Constructor for our main window                 */
/******************************************************************************/
ASetCanvas::ASetCanvas(unsigned long windowId)
  : IFrameWindow( windowId )
  , clientCanvas( WND_SPLITCANVAS, this, this ,IRectangle(),
                  ISplitCanvas::horizontal | IWindow::visible)
  , status( WND_STATUS, &clientCanvas, &clientCanvas )
  , vSetCanvas( WND_VSETCANVAS, &clientCanvas, &clientCanvas )
  , hSetCanvas( WND_HSETCANVAS, &clientCanvas, &clientCanvas )
{
                                       // make split canvas the client area
  setClient( &clientCanvas );
                                       // set alignment of status area text
  status.setAlignment( IStaticText::centerCenter );

                                       // top canvas has 3 vertical decks
  vSetCanvas.setDeckOrientation( ISetCanvas::vertical );
  vSetCanvas.setDeckCount( 3 );
                                       // bottom canvas has 3 horizontal decks
  hSetCanvas.setDeckOrientation( ISetCanvas::horizontal );
  hSetCanvas.setDeckCount( 3 );
  hSetCanvas.setPad(ISize(10,10));    // set some space around buttons

  buttonHandler.useStatus( &status ); // give button handler a text control

  unsigned int i, mid = (NUMBER_OF_BUTTONS/2);
                                      // create the first set of radio buttons
  for (i = 0 ; i setText( STR_TEXT + i );
     }
  radiobut[0]->enableGroup().enableTabStop();   // set tabStop and Group styles
  radiobut[0]->select();                        // select first button in group

                                      // create the second set of radio buttons
  for (i = mid ; i setText( STR_TEXT + i );
     }
  radiobut[mid]->enableGroup().enableTabStop(); // set tabStop and Group styles
  radiobut[mid]->select();                      // select first button in group

  radiobut[0]->setFocus();             // set focus to radio button one
  status.setText( STR_STATUS );        // set status area text from resource

  show();                              // show main window

} /* end ASetCanvas :: ASetCanvas(...) */

/******************************************************************************/
/* ASetCanvas ::~ASetCanvas - Destructor for our main window                  */
/******************************************************************************/
ASetCanvas::~ASetCanvas()
{
   for (unsigned int i = 0; i = WND_BUTTON &&
        ulButtonId <= (wnd_button+number_of_buttons) && output) output->setText( IString( ulButtonId-WND_BUTTON+1 ) );
   else
      fHandled = false;                 // pass event to other handlers

   return fHandled;

} /* end AButtonHandler::selected(...) */
The following figure shows a set canvas created by using the preceding example:
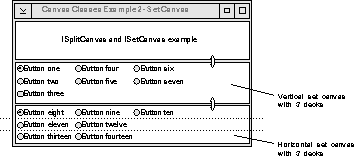
The following sample uses a split canvas as a client area. Two set canvases, each with seven radio buttons, are then added to the split canvas.
#ifndef ASETCV_HPP
#define ASETCV_HPP

#define MAX_BUTTONS  7

#include <iframe.hpp>                   // IFrameWindow
#include <iradiobt.hpp>                 // IRadioButton
#include <ipushbut.hpp>                 // IPushButton
#include <isetcv.hpp>                   // ISetCanvas
#include <isplitcv.hpp>                 // ISplitCanvas

class ASetCanvas : public IFrameWindow {   public:                               //Define the public information     ASetCanvas(unsigned long windowId); //Constructor for this class    ~ASetCanvas();                       //Destructor for this class   private:                              //Define private information     ISplitCanvas    clientCanvas;     IStaticText     status;     ISetCanvas      vSetCanvas,                     hSetCanvas;     IRadioButton  * radiobut[NUMBER_OF_BUTTONS];     AButtonHandler  buttonHandler; };.
ASetCanvas::ASetCanvas(unsigned long windowId)
  : IFrameWindow( windowId )
  /*---------------------------------------------------------------------------|
  |  Create the ISplitCanvases                                                 |
  ----------------------------------------------------------------------------*/
  , horzCanvas1( ID_HORIZCANVAS1, this, this )
  , vertCanvas1( ID_VERTCANVAS1,  &horzCanvas1, &horzCanvas1 )
  , vertCanvas2( ID_VERTCANVAS2,  &horzCanvas1, &horzCanvas1 )
  , vertCanvas3( ID_VERTCANVAS3,  &horzCanvas1, &horzCanvas1 )
  /*---------------------------------------------------------------------------|
  |  Create the ISetCanvases                                                   |
  ----------------------------------------------------------------------------*/
  , setCanvas1( ID_SETCANVAS1, &vertCanvas1, &vertCanvas1 )
  , setCanvas2( ID_SETCANVAS2, &vertCanvas1, &vertCanvas1 )
  , setCanvas3( ID_SETCANVAS3, &vertCanvas2, &vertCanvas2 )
  , setCanvas4( ID_SETCANVAS4, &vertCanvas2, &vertCanvas2 )
  , setCanvas5( ID_SETCANVAS5, &vertCanvas3, &vertCanvas3 )
  , setCanvas6( ID_SETCANVAS6, &vertCanvas3, &vertCanvas3 )
  /*---------------------------------------------------------------------------|
  |  Create the radio buttons for each ISetCanvases                            |
  ----------------------------------------------------------------------------*/
  , vRadioGroup1( ID_VRADIO,      &setCanvas1, 5, AButtons::vertical )
  , vRadioGroup2( ID_VRADIO + 5,  &setCanvas3, 6, AButtons::vertical )
  , vRadioGroup3( ID_VRADIO + 11, &setCanvas5, 7, AButtons::vertical )
  , hRadioGroup1( ID_HRADIO,      &setCanvas2, 5, AButtons::horizontal )
  , hRadioGroup2( ID_HRADIO + 5,  &setCanvas4, 6, AButtons::horizontal )
  , hRadioGroup3( ID_HRADIO + 11, &setCanvas6, 7, AButtons::horizontal )
{
/*-----------------------------------------------------------------------------|
|  Set the icon for the main window and make the split canvas the client area  |
------------------------------------------------------------------------------*/
  setIcon( id() );
  setClient( &horzCanvas1 );

/*-----------------------------------------------------------------------------|
|  Set the split canvas orientation                                            |
------------------------------------------------------------------------------*/
  horzCanvas1.setOrientation( ISplitCanvas::horizontalSplit );
  vertCanvas1.setOrientation( ISplitCanvas::verticalSplit );
  vertCanvas2.setOrientation( ISplitCanvas::verticalSplit );
  vertCanvas3.setOrientation( ISplitCanvas::verticalSplit );

/*-----------------------------------------------------------------------------|
|  Set three ISetCanvases to have 3 vertical decks                             |
------------------------------------------------------------------------------*/
  setCanvas1.setDeckOrientation( ISetCanvas::vertical );
  setCanvas3.setDeckOrientation( ISetCanvas::vertical );
  setCanvas5.setDeckOrientation( ISetCanvas::vertical );

/*-----------------------------------------------------------------------------|
|  Set three ISetCanvases to have 3 horizontal decks                           |
------------------------------------------------------------------------------*/
  setCanvas2.setDeckOrientation( ISetCanvas::horizontal );
  setCanvas4.setDeckOrientation( ISetCanvas::horizontal );
  setCanvas6.setDeckOrientation( ISetCanvas::horizontal );

/*-----------------------------------------------------------------------------|
|  Set each ISetCanvases to have 3 decks                                       |
------------------------------------------------------------------------------*/
  setCanvas1.setDeckCount( 3 );
  setCanvas2.setDeckCount( 3 );
  setCanvas3.setDeckCount( 3 );
  setCanvas4.setDeckCount( 3 );
  setCanvas5.setDeckCount( 3 );
  setCanvas6.setDeckCount( 3 );

  show();

} /* end ASetCanvas :: ASetCanvas */
We create the split and set canvases and make the horizontal split canvas the client area.
We then set the deck orientation and deck count for each set canvas.
The following figure shows an example of a horizontal and vertical set canvas, each with three decks. using this code:
A multicell canvas consists of a grid of rows and columns and looks like a spreadsheet. You place child controls on the canvas by specifying the starting cell and the number of contiguous rows and columns that they can span. You can refer to cells in the grid by the column and row value. The top left cell coordinate is (1,1).
The default cell size is 10 pixels high by 10 pixels wide. The actual number of rows and columns in the canvas is the highest row and column value used. For example, a radio button is placed at (4,5) and a push button at (2,7). Therefore, the canvas has 4 columns and 7 rows. Columns and rows can also be referenced by setColumnWidth and setRowHeight.
The initial size of a row or column is determined by the size of the largest control in that row or column. By default, the row and column sizes are fixed. You can make the rows and columns expandable by using setColumnWidth and setRowHeight (setting the parameter expandable=true), in which case sizing the canvas also sizes them.
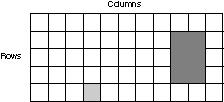
The following figure shows a multicell canvas. Notice that the small window's location is at column 4, row 5 (4,5), while the large window starts at column 9, row 2 (9,2). The large window is 2 columns wide and 3 rows long.
| Note: | A child window in a fixed-sized row and column is automatically sized based on its minimum size, which is typically based on the window's content and the available area within the window. |
You can also leave rows and columns empty to provide spacing between child controls. If you do not explicitly size the empty rows and columns using setRowHeight and setRowWidth, they are sized to the default cell size.
You cannot have more than one window occupy the same "starting cell". (Starting cell means the start row and column you specify when you call addToCell.) However, you can have overlapping cells.
The size of a row or column is initially established by calculating the minimum size needed to hold all the windows in the row or column. In practice, this means the width of a column is set to the minimum width of the largest window in the column. The width is determined by calling IWindow::minimumSize on all windows in the column. The application can set the width or height of a column or row, respectively. If an attempt is made to set a value less than the minimum size of the largest window, the value is saved but ignored because the minimum size is the larger of the hard-coded size for the cell and the minimum size of the window. In other words, the application can reserve more space than the window needs but cannot cause the clipping of the window to occur.
Refer to the Open Class Library Reference for more information about IWindow::minimumSize.
A column or row never has a smaller width or height than the minimum size of the largest window in the column or row. If the windows later calculate a smaller minimum size, the width or height of the column or row is the larger of the following:
The minimum size of the canvas is based on the minimum sizes of all the windows on the canvas plus the size of empty rows and columns. If the area allotted to the canvas is less than this size, the canvas is clipped at the lower right corner. You can use the IViewPort class to add scroll bars to handle this situation.
The multicell canvas has two styles that can help you create layouts with a multicell canvas by providing a way to easily visualize the placement and size of each child window. The gridLines style causes the multicell canvas to have grid lines between the rows and columns of the canvas. Grid lines are stationary. If you want grid lines that you can move with the mouse, use the dragLines style, which causes the multicell canvas to have draggable grid lines between the rows and columns of the canvas.
Here are some considerations when using grid lines and drag lines:
The following example shows you how to create a multicell canvas.
/***********************************************************/
/* MyWindow class declaration                              */
/***********************************************************/
class MyWindow : public IFrameWindow { public:
      MyWindow(unsigned long windowID);
      ~MyWindow();

protected:
      bool command(ICommandEvent& cmdEvent);

private:
      IMultiCellCanvas      myClient;
      IStaticText           stName,
                            stAddress,
                            stId,
                            stBirthday,
                            stPhone;
      IEntryField           efName,
                            efAddress,
                            efId,
                            efBirthday,
                            efPhone;
      ACommandHandler      * commandHandler;
};
MyWindow::MyWindow( unsigned long windowId)
  : IFrameWindow("MultiCell Canvas Example",windowId,
                  IFrameWindow::defaultStyle(),
    myClient( ID_MCC, this, this),
    stName( ID_ST_NAME,  &myClient, &myClient ),
    stAddress( ID_ST_ADDR,  &myClient,&myClient ),
    stId( ID_ST_ID,   &myClient, &myClient ),
    stBirthday( ID_ST_BD,   &myClient, &myClient ),
    stPhone( ID_ST_PHONE, &myClient, &myClient ),
    efName( ID_EF_NAME,  &myClient, &myClient ),
    efAddress( ID_EF_ADDR,  &myClient, &myClient ),
    efId( ID_EF_ID,    &myClient, &myClient ),
    efBirthday( ID_EF_BD,    &myClient, &myClient ),
    efPhone( ID_EF_PHONE, &myClient, &myClient )
  {

   setClient( &myClient );

//*********************************************************
// Build multicell canvas with fields
//*********************************************************
  myClient.addToCell( &stName, 2, 2 );
  myClient.addToCell( &efName, 3, 2 );
  myClient.addToCell( &stAddress, 2, 3 );
  myClient.addToCell( &efAddress, 3, 3 );
  myClient.addToCell( &stId, 2, 4 );
  myClient.addToCell( &efId, 3, 4 );
  myClient.addToCell( &stBirthday, 2, 5 );
  myClient.addToCell( &efBirthday, 3, 5 );
  myClient.addToCell( &stPhone, 2, 6 );
  myClient.addToCell( &efPhone, 3, 6 );

//*********************************************************
// Load the static text fields
//*********************************************************
  stName.setText( "Name:" );
  stName.setForegroundColor(IColor::yellow);
  stName.setAlignment( IStaticText::centerRight );
  stAddress.setText( "Address:" );
  stAddress.setForegroundColor(IColor::yellow);
  stAddress.setAlignment( IStaticText::centerRight );
  stBirthday.setText( "Birthdate:" );
  stBirthday.setForegroundColor(IColor::yellow);
  stBirthday.setAlignment( IStaticText::centerRight );
  stId.setText( "ID:");
  stId.setForegroundColor(IColor::yellow);
  stId.setAlignment( IStaticText::centerRight );
  stPhone.setText( "Phone:");
  stPhone.setForegroundColor(IColor::yellow);
  stPhone.setAlignment( IStaticText::centerRight );

}
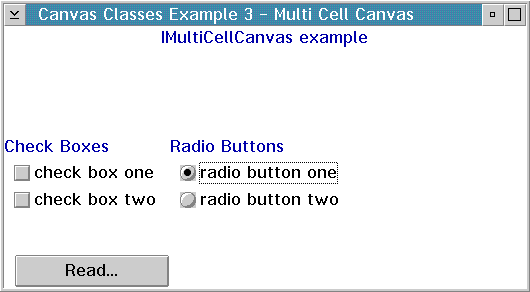
The following examples show you how to create a window containing a multicell canvas. The canvas contains two check boxes, two radio buttons, three static text controls, and one push button.
#include <iframe.hpp> // IFrameWindow #include <istattxt.hpp> // IStaticText #include <ipushbut.hpp> // IPushButton #include <iradiobt.hpp> // IRadioButton #include <icheckbx.hpp> // ICheckBox #include <imcelcv.hpp> // IMultiCellCanvas class AMultiCellCanvas : public IFrameWindow { public: AMultiCellCanvas(unsigned long windowId); private: IMultiCellCanvas clientCanvas; IStaticText status, title1, title2; ICheckBox check1, check2; IRadioButton radio1, radio2; IPushButton pushButton; };.
 1 AMultiCellCanvas::AMultiCellCanvas(unsigned long windowId)
 2   : IFrameWindow(windowId)
 3   , clientCanvas( WND_MCCANVAS, this, this )
 4   , status( WND_STATUS, &clientCanvas, &clientCanvas )
 5   , title1( WND_TITLE1, &clientCanvas, &clientCanvas )
 6   , title2( WND_TITLE2, &clientCanvas, &clientCanvas )
 7   , check1( WND_CHECK1, &clientCanvas, &clientCanvas )
 8   , check2( WND_CHECK2, &clientCanvas, &clientCanvas )
 9   , radio1( WND_RADIO1, &clientCanvas, &clientCanvas )
10   , radio2( WND_RADIO2, &clientCanvas, &clientCanvas )
11   , pushButton( WND_PUSHBUT, &clientCanvas, &clientCanvas )
12 {
13
14   setClient( &clientCanvas );      // make multicell canvas the client area
15   status.setAlignment( IStaticText::centerCenter );// set status area text
16   status.setText( STR_STATUS );
17
18   title1.setAlignment( IStaticText::centerLeft );    // set text and alignment
19   title1.setText( STR_TITLE1 );
20
21   title2.setAlignment( IStaticText::centerLeft );    // set text and alignment
22   title2.setText( STR_TITLE2 );
23
24   check1.setText( STR_CHECK1 );                 // set check box text
25   check2.setText( STR_CHECK2 );
26   radio1.setText( STR_RADIO1 );                 // set radio button text
27   radio2.setText( STR_RADIO2 );
28
29   pushButton.setText( STR_PUSHBUT );
30
31   radio2.select();                      // preselect one radio button
32   check1.enableGroup().enableTabStop();// set tabStop and group styles
33   radio1.enableGroup().enableTabStop();
34   pushButton.enableGroup().enableTabStop();
35
36   clientCanvas.addToCell(&status  , 1, 1, 4, 1);     // add controls to canvas.
37   clientCanvas.addToCell(&title1  , 1, 3, 2, 1);     // the canvas runs from
38   clientCanvas.addToCell(&title2  , 3, 3, 2, 1);     // 1,1 to 4,7
39   clientCanvas.addToCell(&check1  , 2, 4);           // only one row and
40   clientCanvas.addToCell(&check2  , 2, 5);           // one column are
41   clientCanvas.addToCell(&radio1  , 4, 4);           // expandable, as this
42   clientCanvas.addToCell(&radio2  , 4, 5);           // allows the canvas to
43   clientCanvas.addToCell(&pushButton , 2, 7);        // fill the client area.
44
45   clientCanvas.setRowHeight(2, 20, true); // make row 2 20 pixels high and expandable
46
47   clientCanvas.setRowHeight(6, 40); // make row 6 40 pixels high
48
49   clientCanvas.setColumnWidth(4, 40, true);  // make column 4 40 pixels wide and expandable
50
51   check1.setFocus();                         // set focus to first check box
52   show();                                    // show main window
53
54 } /* end AMultiCellCanvas :: AMultiCellCanvas(...) */
| Note: | There is not a 1:1 relationship between
Windows, OS/2 and Motif pixels. |
Line 3 creates a multicell canvas.
Line 14 makes it the client area.
Lines 36 through 43 place the other controls on the canvas using the addToCell member function.
Lines 45 through 49 set the sizes for rows 2 and 6 and column 4. Row 2 and column 4 are expandable.
The following figure shows the completed multicell canvas:
A view port canvas provides a scrollable view area with horizontal and vertical scroll bars. By default, the scroll bars display only when needed. A view port can have only one child control. The size of the child control is fixed. If the view port is smaller than the child control, the view port allows the user to scroll the child control.
If you need more than one control in a view port, place the controls into another type of canvas, which you can then make the child of the view port.
The following example shows how to create a view port.
 /***********************************************************/
 /* AViewWindow declaration                                 */
 /***********************************************************/
 class AViewWindow : public IFrameWindow {  public:

    AViewWindow(unsigned long windowId);
    ~AViewWindow();
    AViewWindow & moveHoriz();
    AViewWindow & moveVert();
 private:
    ITitle          title;
    IViewPort       viewPort;
    ICanvas         canvas;
    IStaticText     text;
    IMultiLineEdit  mle1;
    IMultiLineEdit  mle2;
    ACommandHandler *commandHandler;
};
/*************************************************************/
/* Window constructor                                        */
/*************************************************************/
AViewWindow::AViewWindow(unsigned long windowId)
   : IFrameWindow(windowId,
     IFrameWindow::defaultStyle() |
     IFrameWindow::menuBar),
     title(this, "View Port Example"),
     viewPort(WID_VIEWPORT, this,this, IRectangle()),
     canvas(WID_CANVAS, &viewPort, &viewPort, IRectangle(5, 5, 410, 460)),
     text(WID_TEXT, &canvas, &canvas, IRectangle(10, 360, 400, 410)),
     mle1(WID_MLE1, &canvas, &canvas, IRectangle(10, 0, 400, 149)),
     mle2(WID_MLE2, &canvas, &canvas, IRectangle(10, 160, 400, 349))

{

  viewPort.setColor(IViewPort::fillBackground, IColor::kYellow);
  setClient(&viewPort);
  text.setText("Enter some data into the MLE, please");

//*************************************************************
// Command Handler
//*************************************************************
  commandHandler = new ACommandHandler(this);
  commandHandler->handleEventsFor(this);
  sizeTo(ISize(500,300));
  show();

}

AViewWindow::~AViewWindow()
{
  commandHandler->stopHandlingEventsFor(this);
  delete commandHandler;
}
/*************************************************************/
/* Horizontal move event handler                             */
/*************************************************************/
AViewWindow & AViewWindow :: moveHoriz()
 {
      viewPort.scrollViewHorizontallyTo(200);
      return(*this);
 }

/*************************************************************/
/* Vertical move event handler                               */
/*************************************************************/
AViewWindow & AViewWindow :: moveVert()
 {
      viewPort.scrollViewVerticallyTo(200);
      return(*this);
 }

/*************************************************************/
/* Command handler                                           */
/*************************************************************/
ACommandHandler::ACommandHandler(AViewWindow *viewWindow)
{
  view = viewWindow;
}

/*************************************************************/
/* Command handler                                           */
/*************************************************************/
bool ACommandHandler::command(ICommandEvent & cmdEvent)
{
  bool eventProcessed(true);

  switch (cmdEvent.commandId())
  {
    case ID_HORIZ:
      view->moveHoriz();
      break;
    case ID_VERT:
      view->moveVert();
      break;
    default:
     eventProcessed = false;
  }
 return true;
}
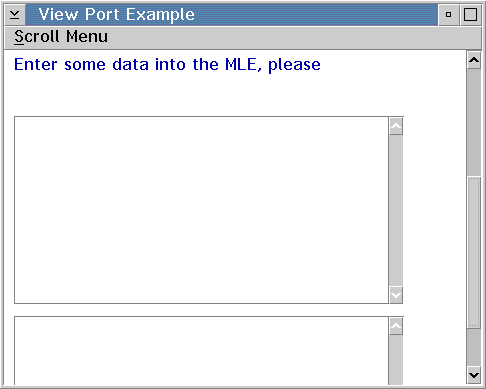
The following figure shows the view port created with the preceding code.
![]()
Using List and Slider Controls
Creating and Using Text Controls
![]()
ICanvas
IMultiCellCanvas
ISetCanvas
ISplitCanvas
IViewPort
