Use the INotebook class objects to create notebooks or wrapper existing notebooks and Windows tab controls. These INotebook objects function like other control objects in the library. You can use a notebook as the client of a frame window, outside the client area of a frame extension, or within any canvas class. Typically, you create a notebook as the client of a frame window.
![]() The INotebook class supports both the CUA
'91 notebook control and the Windows tab control. The CUA
notebook control is a ported version of the OS/2 Presentation
Manager notebook control. It has the same look-and-feel as the
OS/2 Presentation Manager notebook control and is available on
all three platforms: AIX, OS/2 and Windows. The Windows tab
control is a control that is native to the Windows environment.
Since the Windows tab control does not provide all of the
features available with the pmCompatible notebook, portable
applications requiring these features should use the pmCompatible
notebook in the Windows environment as well.
The INotebook class supports both the CUA
'91 notebook control and the Windows tab control. The CUA
notebook control is a ported version of the OS/2 Presentation
Manager notebook control. It has the same look-and-feel as the
OS/2 Presentation Manager notebook control and is available on
all three platforms: AIX, OS/2 and Windows. The Windows tab
control is a control that is native to the Windows environment.
Since the Windows tab control does not provide all of the
features available with the pmCompatible notebook, portable
applications requiring these features should use the pmCompatible
notebook in the Windows environment as well.
![]() The INotebook class on AIX supports a
notebook control compatible with the CUA '91 notebook control
available on OS/2 and with the pmCompatible notebook on Windows.
The INotebook class on AIX supports a
notebook control compatible with the CUA '91 notebook control
available on OS/2 and with the pmCompatible notebook on Windows.
Use the style, INotebook::pmCompatible, to select the CUA '91 notebook control. The Windows tab control is the default selection in the Windows environment.
You can specify notebook styles during notebook creation to define the look and feel of the notebook, or you can use the default notebook styles provided by the Open Class Library. The default notebook styles are the following:
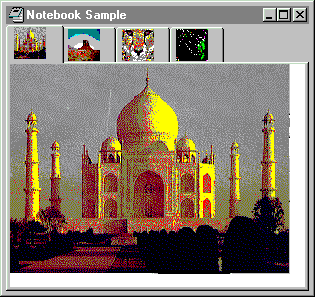
The following figure shows the appearance of the Windows native notebook control created using the default notebook styles. This notebook is a modified version of the notebook sample contained in the \samples\ioc\notebook directory.
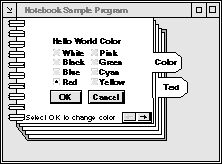
The next figure shows the appearance of the CUA notebook control created using the default notebook styles and INotebook::pmCompatible. This notebook is a modified version of the notebook sample contained in the \samples\ioc\notebook directory

The notebook control resembles a real notebook in its general appearance. For example, the notebook has a binding that, along with recessed pages on the right and bottom edges, gives the notebook a three-dimensional appearance. The binding is solid and placed on the left side, using the default INotebook styles backPagesBottomRight and solidBinding.
In the bottom right corner of the notebook are the page buttons. These buttons are for bringing one page of the notebook into view at a time. They are a standard component provided with every notebook. Your application can change the default width and height of the page buttons using INotebook::setPageButtonSize. However, you cannot query the size of the page buttons.
Selecting the forward page button (the arrow pointing to the right) causes the next page to be displayed; selecting the backward page button (the arrow pointing to the left) causes the previous page to be displayed.
To the left of the page buttons when using the default notebook style is the status line, which enables your application to provide information to the user about the page currently displayed. The notebook does not supply any default text for the status line. You are responsible for using INotebook::PageSettings::setStatusText or INotebook::setStatusText to associate a text string with the status line of each page. By default, the text in the status line is left-justified.
The page buttons are always
located in the corner where the recessed edges of the notebook
intersect. These recessed edges are called the back pages.
The default notebook's back pages intersect in the bottom
right corner, which means the recessed pages are on the bottom
and right edges.
The back pages are important
because their intersection determines where the major tabs
can be placed, which in turn determines the
placement of the binding and the minor tabs. You can use
major and minor tabs to organize related pages into sections;
minor tabs define
subsections within major tab sections. The content of each
section has a common theme, which is represented to the user by a
tabbed divider, similar to a tabbed page in a notebook.
The default style, INotebook::majorTabsRight, specifies that major tabs, if used, are placed on the right side of the notebook. This is the default placement when the back pages intersect at the bottom right corner of the notebook. The binding is located on the left because it is always located on the opposite side of the notebook from the major tabs.
Minor tabs are always placed perpendicular to the major tabs, based on the intersection of the back pages and the major tab placement.
| Note: | You can only specify one major or minor tab attribute for each notebook page in OS/2 Version 2.x This restriction is removed in OS/2 Warp Version 3.0, however, the text for both tabs is always the same. |
Minor tabs are displayed only as the associated major tab page is selected or if the notebook has no major tab pages.
The default shape of the tabs used on notebook divider pages is square. You can change the default width and height of the major and minor tabs using INotebook::setMajorTabSize and INotebook::setMinorTabSize, respectively.
A notebook tab may contain either text or a bitmap. You can place text on a tab using INotebook::PageSettings::setTabText or INotebook::setTabText. Use INotebook::PageSettings::setTabBitmap or INotebook::setTabBitmap to place a bitmap on a tab. You cannot position a bitmap on a tab using the default support because the bitmap stretches to fill the rectangular area of the tab. However, you may use the owner draw support to control the positioning and drawing of the bitmap on a tab.
![]() The Windows tab control has the following
behavior:
The Windows tab control has the following
behavior:
Use the INotebook class to create and manage the notebook control window. You can create an object of this class using one of the following constructors:
INotebook( unsigned long     windowId,
           IWindow*          parent,
           IWindow*          owner,
           const IRectangle& initial = IRectangle(),
           const Style&      style = defaultStyle() );

INotebook( unsigned long windowId,
           IWindow*      parentAndOwner );

INotebook( const IWindowHandle& handle );
Only the first of the three constructors creates a new notebook control. This constructor accepts a numeric identifier for the notebook, a pointer to a window object for its parent window, and a pointer to a window object for its owner window. You can optionally specify the position, size, and styles of the notebook.
The next two constructors wrapper an existing notebook control. The first of these two constructors is designed to wrapper a notebook control that is loaded as a dialog resource. It accepts a numeric identifier for the notebook, and a pointer to a window object for its parent and owner window. The last of these two constructors is designed to wrapper an existing notebook control. It accepts the existing notebook's window handle.
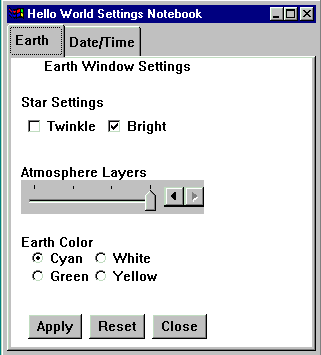
Version 6 of the Hello World application, hello6, creates a notebook as a private data member, helloSettingsNotebook, from a derived IFrameWindow class, called ANotebookWindow. The helloSettingsNotebook object is initialized on the ANotebookWindow constructor using the following INotebook constructor from the anotebw6.cpp file:
ANotebookWindow :: ANotebookWindow(unsigned long windowId,
                                   AHelloWindow * ownerWnd)
  : IFrameWindow(IResourceId(windowId), ownerWnd)
  , helloSettingsNotebook(WND_NOTEBOOK, this, this)
This constructor creates the notebook as a child window of the ANotebookWindow object and uses the default style.
The following figure shows the Hello World version 6 notebook control.
You can specify notebook styles during notebook creation to define the look and feel of the notebook. The Open Class Library provides notebook styles so that your application can specify or change the notebook's styles.
Refer to the INotebook class in the Open Class Library Reference for a complete list of available notebook styles.
| Note: | When you specify an INotebook style on the notebook constructor, ensure that no conflicts occur. Many of the style choices are not independent from one another. |
If you specify more than one style bit, you must use a bitwise OR operator (|) to combine them.
If you want to specify notebook styles other than the default when you are creating a notebook, create an object of the INotebook class, initialize it, and pass a reference to it on the constructor that accepts a style parameter. For example in the notebook.cpp file, we do the following:
ABitmapNotebook :: ABitmapNotebook(unsigned long windowId)
        :IFrameWindow(windowId)
        ,reslib()
        ,tabSize(50,50)
        ,tab1(reslib.loadBitmap(BM_PAGE1, tabSize))
        ,tab2(reslib.loadBitmap(BM_PAGE2, tabSize))
        ,tab3(reslib.loadBitmap(BM_PAGE3, tabSize))
        ,tab4(reslib.loadBitmap(BM_PAGE4, tabSize))
        ,notebook( WND_NB, this, this, IRectangle()
                           , INotebook::defaultStyle()
                           &~INotebook::majorTabsRight
                           | INotebook::majorTabsBottom
                           | INotebook::roundedTabs
                           | INotebook::spiralBinding
The notebook created using the preceding statements has a spiral binding and tabs with rounded corners on the bottom.
This complete sample is found in the \samples\ioc\notebook directory.
A modified version of the Hello World notebook is shown below.
You can create a notebook, specify its style, and change the size of major tabs and minor tabs with the following statements:
  INotebook
   *pnoteBook = new INotebook( ID_NOTEBOOK,
                               this,
                               this,
                               IRectangle(),
                               (INotebook::spiralBinding |
                                INotebook::backPagesTopRight |
                                INotebook::majorTabsRight |
                                INotebook::statusTextLeft |
                                IWindow::visible) );

  pnoteBook->setMajorTabSize( ISize( 60, 30 ) );
  pnoteBook->setMinorTabSize( ISize( 80, 40 ) );
The notebook created using the preceding statements has a spiral binding, back pages on the right and top edges, major tabs on the right, status text that is left-justified, and is visible.
If you do not code the style on the first constructor, the static function, INotebook::defaultStyle determines the style. Initially, this function returns the default style, INotebook::classDefaultStyle. Use the function INotebook::setDefaultStyle to change the notebook's default style setting.
Once you create your notebook, you can change the various styles using member functions provided by INotebook that change the binding, orientation, tab shape, and tab text alignment of the notebook.
A page setting object lets the user change and set information about pages in a notebook. Use the INotebook::PageSettings and INotebook::PageSettings::Attribute classes to create each page of the notebook.
Use the nested class INotebook::PageSettings to describe the characteristics of a notebook page before you add it to the notebook. An INotebook::PageSettings object defines page attributes like the use of major or minor tabs, automatic sizing behavior, the text or bitmap for the tabs, and the text for the status area.
Use INotebook::PageSettings::Attribute to specify the attributes of a page. This class is similar to a style class and has constant values defined for its values.
When inserting new pages into a notebook, carefully consider how your user will expect those pages to be organized. For an existing notebook especially, the underlying hierarchy must be observed when inserting new pages to provide efficient organization and navigation through the information contained in the notebook.
Use the following list of add functions to insert new pages into the notebook:
All of these functions contain an optional parameter, pageWindow that you can use to specify a page window to associate to a notebook page. A page window is an application window that you associate with a page of a notebook.
After a page is inserted into a notebook, you must facilitate the display of the information for this page when it is brought to the front of the notebook. The notebook provides a top page area in which the application can display page windows for the topmost page. For each inserted page, the application must associate the handle of a page window that is to be invalidated when the page is brought to the top of the book. You can associate the same handle with different pages.
The page window may be an IFrameWindow that you create from a dialog template, or it may be one of the ICanvas derived classes. You can associate a page window to a page of a notebook when you add the page to the notebook, or you can specify it later using INotebook::setWindow. You determine the best time to associate your application window, immediately or delayed, based upon the resource requirements of your notebook.
| Note: | You can
define page windows using different window types, but we
recommend using one of the canvas classes. When using a
canvas class for your notebook page, you may need to set
the size of the pages. For example: page1.sizeTo( page1.minimumSize() ); |
Use IPageHandle to identify a page once it is in the notebook. An IPageHandle is a wrapper class for the numeric identifier assigned to a page when you add it to the notebook. You use IPageHandle on most operations affecting the characteristics of the page and to remove the page from the notebook.
The following sample comes from the Hello World version 6 anotebw6.cpp file:
INotebook::PageSettings
       helloSettings(INotebook::PageSettings::majorTab|
       INotebook::PageSettings::autoPageSize);
helloSettings.setTabText(IResourceId(STR_EARTHTAB));
helloSettingsNotebook.addFirstPage(helloSettings,&earthPage);
helloSettings.setTabText(IResourceId(STR_DATETIMETAB));
helloSettingsNotebook.addLastPage(helloSettings,&dateTimePage);

#ifndef IC_MOTIF
helloSettingsNotebook.setMajorTabSize(ISize(100,30));  // Ignored on Motif
#endif
Each notebook page window, in this case, is a multicell canvas. Hello World version 6 creates a PageSettings object, helloSettings, to contain the specifications for each notebook page. The object is created with the INotebook::PageSettings::Attributes that specify major tabs and automatic page sizing. The tab text is set to the text used to label the earthPage using the resource ID of the string to load from the resource file.
Hello World version 6 creates the first notebook page by specifying the INotebook::PageSettings object and the page window object to be associated with this page. To create the next page, load the notebook tab text for the dateTimePage from the resource file into the page settings and use INotebook::addLastPage. If you wanted to add more pages to Hello World version 6, you would use INotebook::addLastPage to append pages to the end of the notebook.
You can remove pages from the notebook by supplying the IPageHandle that was returned when the page was created.
Use the following INotebook functions to remove notebook pages:
Refer to the Open Class Library Reference for more information about these INotebook functions.
Your application can tailor the color of almost any part of the notebook. Use the various color functions to change the colors of a notebook.
When you change the color in a control area, the presentation system passes this color change request to all the children of the control. This causes a child window with the same color control area to change to the new specified color if its control area has not been explicitly set. Therefore, changing colors in the notebook can cause changes to the page windows on the notebook.
Use the following INotebook functions to change the notebook's color:
![]() You cannot create a Merlin style notebook
directly using the INotebook class, but you can create a notebook
with this style (using WinCreateWindow) and construct an
INotebook object for it. The following example illustrates this
method:
You cannot create a Merlin style notebook
directly using the INotebook class, but you can create a notebook
with this style (using WinCreateWindow) and construct an
INotebook object for it. The following example illustrates this
method:
/******************************************************************************
* Merlin Notebook Sample Program:  This program creates a Merlin style        *
* notebook as a client window.  The notebook is created via WinCreateWindow   *
* and an object is then constructed for it using an INotebook wrapper         *
* constructor.  The OS/2 Warp 4.0 Toolkit must be installed in order to       *
* implement this sample.                                                      *
******************************************************************************/
extern "C" {
  #define INCL_WIN
  #define INCL_WINSTDBOOK
  #include
}

#include
#include
#include
#include

#define WND_MAIN    1000
#define WND_NB      1010
#define WND_STATIC1 2110
#define WND_STATIC2 2120
#define WND_STATIC3 2130
#define WND_STATIC4 2140

/**************************************************************************
* Class AMerlinNotebook -- Sample application that constructs an OS/2     *
* Warp 4.0 BKS_TABBEDDIALOG style notebook and wrappers it with an        *
* INotebook object.                                                       *
**************************************************************************/
class AMerlinNotebook : public IFrameWindow
{
public:
/*---------------------------- Constructor ------------------------------*/
  AMerlinNotebook(unsigned long windowId);

virtual
  ~AMerlinNotebook() { };

  INotebook
    *notebook;
  IStaticText
    *static1,
    *static2,
    *static3,
    *static4;
};

/**************************************************************************
* main() - Construct the frame window with a notebook client and run the  *
* application.                                                            *
**************************************************************************/
int main()
{
   AMerlinNotebook mainWindow( WND_MAIN );
   mainWindow.show();
   IApplication&colon.&colon.current().run();
   return 0;
}

/**************************************************************************
* AMerlinNotebook &colon.&colon. AMerlinNotebook - constructor                        *
*                                                                         *
* Construct the IFrameWindow using the default style.                     *
* Create the BKS_TABBEDDIALOG notebook as a child window of the frame.    *
**************************************************************************/
AMerlinNotebook &colon.&colon. AMerlinNotebook( unsigned long windowId )
        &colon.IFrameWindow( windowId )
{
  // Create a Merlin style notebook directly via WinCreateWindow.
  IWindowHandle hwndNotebook = WinCreateWindow(
                                  handle(),          // parent
                                  WC_NOTEBOOK,       // notebook class
                                  NULL,              // window text
                                  BKS_TABBEDDIALOG   // window style
                                   | BKS_MAJORTABTOP
                                   | WS_VISIBLE,
                                  0, 0, 0, 0,        // window rectangle
                                  handle(),          // owner
                                  HWND_TOP,          // insertion order
                                  WND_NB,            // window id
                                  NULL,              // control data
                                  NULL );            // presentation parms
  // Now create an INotebook object by using the INotebook wrapper
  // constructor.
  notebook = new INotebook( hwndNotebook );

  // Create some static text to use for the page windows.
  static1 = new IStaticText( WND_STATIC1, notebook, notebook );
  static2 = new IStaticText( WND_STATIC2, notebook, notebook );
  static3 = new IStaticText( WND_STATIC3, notebook, notebook );
  static4 = new IStaticText( WND_STATIC4, notebook, notebook );
  static1->setText( "Page one" );
  static2->setText( "Page two" );
  static3->setText( "Page three" );
  static4->setText( "Page four" );

  // Create a page settings object that specifies that pages should have a
  // major tab and pages should be automatically sized to fit the
  // notebook.  For each page to be added to the notebook, set the tab text.
  INotebook&colon.&colon.PageSettings pageSettings(
                                 INotebook&colon.&colon.PageSettings&colon.&colon.majorTab |
                                 INotebook&colon.&colon.PageSettings&colon.&colon.autoPageSize );

  pageSettings.setTabText( "Page 1" );
  notebook->addLastPage( pageSettings, static1);
  pageSettings.setTabText( "Page 2" );
  notebook->addLastPage( pageSettings, static2);
  pageSettings.setTabText( "Page 3" );
  notebook->addLastPage( pageSettings, static3);
  pageSettings.setTabText( "Page 4" );
  notebook->addLastPage( pageSettings, static4);

  // Size the notebook and make it the client of the frame window.
  notebook->sizeTo( ISize( 400, 400 ));
  setClient( notebook );
}
While the BKS_TABBEDDIALOG notebook can be wrappered with an INotebook object, not all of the INotebook member functions are applicable to notebooks with this style. The following INotebook styles are not applicable to the Merlin style notebook:
majorTabsLeft
majorTabsRight
polygonTabs
roundedTabs
squareTabs
solidBinding
spiralBinding
statusTextLeft
statusTextRight
statusTextCenter
tabTextLeft
tabTextRight
tabTextCenter
The following INotebook member functions should not be used with the Merlin style notebook:
binding
setBinding
setPageButtonSize
setStatusTextAlignment
statusTextAlignment
setMinorTabSize
setTabShape
tabShape
setTabTextAlignment
tabTextAlignment
For more complete information about the Merlin style notebook, refer to the Presentation Manager Programming Guide and Reference.
![]()
Creating a Frame Window
Layout Using Canvas Controls
![]()
IFrameWindow
INotebook
INotebook::PageSettings
IPageEvent
IPageHandler
