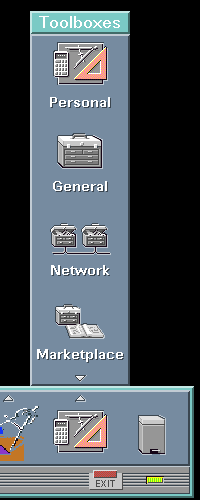
The toolboxes are containers for applications and utilities.
There are three toolboxes:
- Personal Toolbox
- Your personally-configurable toolbox. You can create actions yourself or copy
them from other toolboxes.
- General Toolbox
- Contains applications and utilities built into HP VUE or provided by the
system administrator.
- Network Toolbox
- Lets you access actions on other systems.
You can think of the toolboxes as File Manager views of special directories set
aside for applications and utilities. However, within a toolbox, you cannot go
up past the top level of the toolbox, which is represented in the status line
by / ... /.
Each application or utility is represented by an icon called an action icon.
Actions and their icons are HP VUE's way of creating a visual representation for
applications, utilities, and other commands.
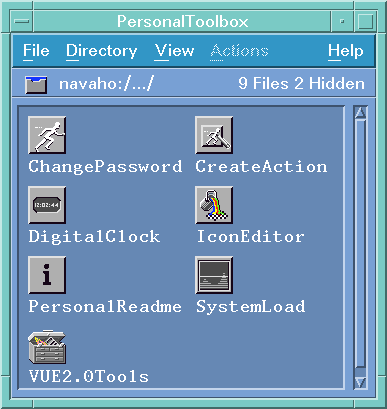
The Personal Toolbox is a container for applications and utilities you use
frequently or create yourself.
Initially, the personal toolbox contains:
- Actions you personally place there.
- Several Actions from the General Toolbox that you may want to use frequently.
- Other actions provided by your system administrator.
You have control over the contents of your Personal Toolbox. You can add and
remove tools, and organize the contents by creating subdirectories.
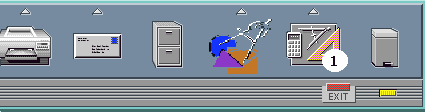
- Click the Tools control in the Front Panel.
- Or, choose Personal in the Toolboxes subpanel.
- Double-click an action icon. If the application requires file data, a
prompt is displayed.
- Or, drop a data file onto the action icon (if the application or
utility accepts file data
To get help on an action icon select the action and press F1
- Choose New from the Directory menu.
- In the Personal Toolbox - New Directory dialog box, enter a name into the
New Directory Name Field.
- Choose OK or press Return.
- Put the action icon on your Desktop.
- Or, add the action to your Front Panel.
- Or, copy (Ctrl+drag) the action icon to a directory where
you'll be using it frequently.
It is often useful to copy action icons to directories containing application
data.
- If the action takes a data file, you can drop the data file on the
action icon using only one File Manager view.
- If the action prompts for data when double-clicked, you can supply a
filename (without the entire path). The action assumes the data file is located
in the same directory as the action icon.
- Drop the action icon on the Tools control in the Front Panel.
- Or, open both the Personal Toolbox and the toolbox containing the
icon. Copy the action icon to the Personal Toolbox.
- If you have not already done so, install the application on your system
and find out the command line you would execute to start the application from
a Terminal Emulator.
- Double-click CreateAction in the Utilities subdirectory of the System
Toolbox to display the Create Action dialog box.
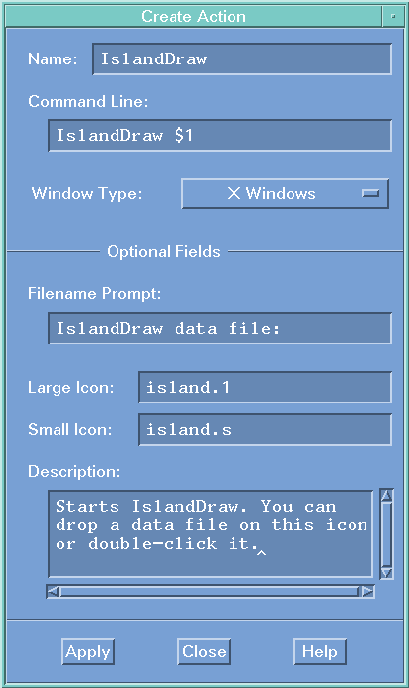
- In the Name field, type a unique name for the action.
- In the Command Line field, type the command that would start the application.
If the command takes a data file, substitute $n for each argument, where
n is 1 for the first data file, 2 for the second, etc.
(Example: Wingz $1)
- Use the Window Type options menu to select how the action's output will
be displayed. Select X Windows if the application creates it's own window:
Select Terminal if the application runs in a Terminal Emulator window.
- Choose Apply.
- An icon for the action will appear in your Personal Toolbox.
The action definition will be put in a new configuration file. A dialog box
will tell you the location of the new configuration file.
- Test the action by double-clicking the action icon. If it doesn't work
properly, edit the fields in the Create Action dialog and Apply your changes.
- When you are satisfied that the action is working properly, choose Close.
If the application is located on another system, you can use remsh in
the Command Line. However, HP VUE actions provide a better way to start
applications on other systems.
The General Toolbox is a container for:
- Actions built into HP VUE.
- Actions placed there by your system administrator for system-wide use.
You can move about in the General Toolbox and invoke actions from it.
However, you are not allowed to write to it (unless you are logged in as
superuser). Therefore, you cannot add actions logged in as yourself, a dialog
box will prompt you for the root password.
- Display the Toolboxes subpanel by choosing the up arrow above the Tools
control.
- Choose General in the Toolboxes subpanel.
- Put the action on your Desktop.
- Or, copy the action to your Personal Toolbox.
- Or, add the action to your Front Panel.
The Network Toolbox lets you use actions that are defined on other systems.
The top level of the Network Toolbox contains a subdirectory for each remote
system whose actions you can access.
The Marketplace Toolbox contains a help file which accesses different companies
and their products which can be used on the HP systems.