
Version 4 modifies the menu bar and the pull-down menu in the following ways:
Hello World version 4 application contains a resource file from the Open Class Library, with definitions for accelerators. In OS/2, the accelerator definitions require that you specify #include <os2.h> in the .RC file.
For Motif, this include statement can stay in the resource file for portability without failure. However, ipmrc2X will report the following message:
1506-296 (S) #include file <os2.h> not found
Ignore this error.

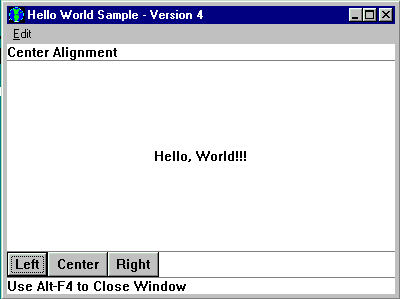
The main window for version 4 of the Hello World application looks like this:
The following files contain the code used to create version 4:
| File | Type of Code | |
|---|---|---|
| ahellow4.cpp |
Source code for the main procedure, main window constructor, and command processing | |
| ahellow4.hpp | Header file for the AHelloWindow class | |
| ahellow4.h | Symbolic definitions for the hello4 executable file | |
| adialog4.cpp | Source code to create the ATextDialog class | |
| adialog4.hpp | Header file for the ATextDialog class | |
| ahellow4.rc | Resource file for the hello4 executable file | |
| ahellow4.ico | Icon file for the hello4 executable file |
The ahellow4.cpp file contains the source code for the main procedure and the AHelloWindow and ACommandHandler classes. The tasks performed by this code are described in the following sections.
The ahellow4.hpp file, like the ahellow3.hpp file, contains the class definition and interface specifications for the AHelloWindow class, with a few modifications for version 4.
The ahellow4.h file contains the symbolic definitions for this application. These definitions provide the IDs for the application window components.
For version 4, the symbolic definition file contains the Hello World version 3 code, as well as the following:
The adialog4.cpp file contains the source code for the ATextDialog class constructor and functions created for version 4.
The adialog4.hpp file contains the class definition and interface specifications for the ATextDialog class.
Version 4 provides a resource file, ahellow4.rc. This resource file assigns an icon and several text strings with the constants defined in the ahellow4.h file, the symbolic definitions File. It also contains resources for the menu bar and the accelerator keys. The ahellow4.h file is included in this resource file so the icon, text strings, and other resources can be associated with the appropriate IDs.
OS2.H is included because it is the top level include file that includes all the files necessary for writing an OS/2 application.
The resource file for version 4 contains the version 3 code, as well as additional strings, updated menus, and command IDs. The first is the accelerator table of command IDs assigned to the function keys. These command IDs are used in the cascaded menu to show the accelerator, or shortcut, key assignments. For example, with these assignments and the command processing in ahellow4.cpp, when users press the F7 key, it is the same as if they select the Left choice in the cascaded menu.
![]() Open Class Library provides conversion tools for
converting Windows, Motif, and OS/2-style resources.
Open Class Library provides conversion tools for
converting Windows, Motif, and OS/2-style resources.
See Converting Resource Files for more information about the resource file conversion tools for each platform.
The ahellow4.ico file is used as the icon that displays when the application is minimized. This icon is the same as for versions 2 and 3.
![]() The Open Class Library provides tools for converting
Windows, Motif, and OS/2 bitmaps and icons.
The Open Class Library provides tools for converting
Windows, Motif, and OS/2 bitmaps and icons.
The following sections describe each of the tasks performed by version 4 of the Hello World application that have not been described for previous versions.
For version 4, there are several modifications to the menu bar and its associated pull-down menu.
Version 4 replaces the Alignment menu bar choice with Edit and makes the Alignment choice a menu item on the Edit pull-down menu. When the Edit pull-down menu displays, an arrow to the right of the Alignment choice indicates that a cascaded menu will display to the right when it is selected. The Alignment and Edit choices are defined in the AIX and OS/2 ahellow4.rc file, as follows:
MENU WND_MAIN                                   //Main window menu bar
  BEGIN
    SUBMENU "~Edit", MI_EDIT                    //Edit submenu
      BEGIN
        SUBMENU "~Alignment", MI_ALIGNMENT      //Alignment submenu
          BEGIN
            MENUITEM "~Left\tF7",   MI_LEFT     //Left menu item - F7 Key
            MENUITEM "~Center\tF8", MI_CENTER   //Center menu item - F8 Key
            MENUITEM "~Right\tF9",  MI_RIGHT    //Right menu item - F9 Key
          END
        MENUITEM "~Text...", MI_TEXT            //Text dialog menu item
      END
  END
This appears in the Windows .rc file as follows:
WND_MAIN  MENUEX                                            // Main Window Menubar
  BEGIN
    POPUP     "&Edit"                  ,  MI_EDIT
      BEGIN
        POPUP     "&Alignment"             ,  MI_ALIGNMENT  // File submenu
          BEGIN
            MENUITEM  "&Left\tF7"              ,  MI_LEFT
            MENUITEM  "&Center\tF8"            ,  MI_CENTER
            MENUITEM  "&Right\tF9"             ,  MI_RIGHT
          END
        MENUITEM  "&Text..."               ,  MI_TEXT       // Text menu item
      END
  END
All Windows menu resources need to use the menu keyword MENUEX (instead of MENU) when compiling menu resources. In addition, all submenus (which in Windows are specified in the resource file with the keyword POPUP) should be identified with a menu item identifier, just like in OS/2.
Keyboard accelerators are key sequences that perform the same
actions as menu items. In version 3, the Left, Center,
and
Right choices appeared as items in a pull-down menu. In
version 4, these choices become part of the cascaded menu and are
assigned a function key. The menu items are defined in the in
ahellow4.rc file, with text describing the function and the
accelerator key to use. The following code, from the OS/2
resource file, shows the corresponding accelerator keys for each
menu action:
MENUITEM "~Left\tF7",   MI_LEFT     //Left Menu Item - F7 Key
MENUITEM "~Center\tF8", MI_CENTER   //Center Menu Item - F8 Key
MENUITEM "~Right\tF9",  MI_RIGHT    //Right Menu Item - F9 Key
The Windows menu items and accelerator keys are also defined in the in ahellow4.rc as follows:
MENUITEM  "&Left\tF7"                ,  MI_LEFT
MENUITEM  "&Center\tF8"              ,  MI_CENTER
MENUITEM  "&Right\tF9"               ,  MI_RIGHT
The Windows accelerators use an ampersand (&) instead of the tilde (~).
The \t indicates that the accelerator key name is tabbed to the right for readability.
This code conveys to users that the Left, Center, and Right alignment choices can be made by selecting a menu item with the mouse or keyboard, or they can use the keyboard function keys F7, F8, and F9.
The menu choices for Left, Center, and Right are visual indicators to the user that F7, F8, and F9 can be used. The main window in ahellow4.cpp must be programmed to use the accelerator. This is done by using the accelerator style on the AHelloWindow constructor, as shown in the following code from the ahellow4.cpp file as follows:
AHelloWindow :: AHelloWindow(const unsigned long windowId)
  :IFrameWindow(IFrameWindow::defaultStyle() |
               IFrameWindow::minimizedIcon  |
               IFrameWindow::accelerator,
               windowId)
The default processing for this style causes the resource file to be searched for an ACCELTABLE definition for WND_MAIN which is the main window ID. The accelerator table for version 4 is defined in the ahellow4.rc file:
WND_MAIN  ACCELERATORS
  BEGIN
    VK_F7       ,    MI_LEFT                       ,  VIRTKEY
    VK_F8       ,    MI_CENTER                     ,  VIRTKEY
    VK_F9       ,    MI_RIGHT                      ,  VIRTKEY
  END
For OS/2, the .rc file would contain the following:
ACCELTABLE WND_MAIN                             //Acc. Table for Main Window
  BEGIN                                         //
    VK_F7,  MI_LEFT,   VIRTUALKEY               //F7 - Left Command
    VK_F8,  MI_CENTER, VIRTUALKEY               //F8 - Center Command
    VK_F9,  MI_RIGHT,  VIRTUALKEY               //F9 - Right Command
  END                                           //
The final modification to the pull-down menu adds the Text... choice. By convention, the ellipsis (...) indicates that selecting this choice causes a dialog window to display.
The following code from the ahellow4.rc file adds the Text... choice on the AIX or OS/2 operating system:
MENUITEM "~Text...", MI_TEXT //Text Menu Item
The following figure shows the pull-down menu choices and the cascaded menu.

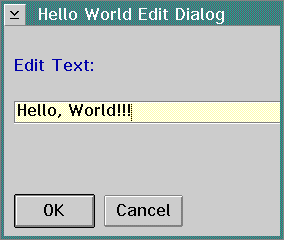
A dialog window is a specific type of frame window containing window controls that gather information from the user. Typically, dialog windows are defined as modal to the owner frame window, that is, the user must respond to the dialog window before returning to the previous frame.
In OS/2 Presentation Manager (PM), you use dialog templates to define dialog windows externally to the application. The application creates an Open Class Library frame window with the same window ID defined in the resource file for the dialog template. Any controls from the dialog, for example entry fields, that you want to manipulate using the Open Class Library are also constructed from the corresponding control ID from the resource file. The following example shows an OS/2 dialog template that you could use with Hello World version 4:
DLGINCLUDE 1 "AHELLOW4.H"

DLGTEMPLATE WND_TEXTDIALOG LOADONCALL MOVEABLE DISCARDABLE
BEGIN
   DIALOG  "Hello World Edit Dialog", WND_TEXTDIALOG, 17, 22, 137, 84,
           WS_VISIBLE, FCF_SYSMENU | FCF_TITLEBAR
   BEGIN
           DEFPUSHBUTTON   "OK", DID_OK, 6, 4, 40, 14
           PUSHBUTTON      "Cancel", DID_CANCEL, 49, 4, 40, 14
           LTEXT           "Edit Text:", DID_STATIC, 8, 62, 69, 8
           ENTRYFIELD      "", DID_ENTRY, 8, 44, 114, 8, ES_MARGIN
   END
END
If you use the Open Class Library only for AIX or if you write portable applications, you should not use dialog templates, because they are not supported in AIX. Alternatively, you can use Open Class Library canvas controls.
See Layout Using Canvas Controls for information about the canvas classes. This Hello World version provides an example of using canvases.
In Hello World version 4, the dialog window contains the following:
Because these controls are best organized into columns and
rows, use a multicell canvas control. However, because all
controls in a column must be the same width, aligning the OK
push button with the prompt would cause the Cancel push
button to be placed to the right of the
prompt text. Therefore, place the push buttons in a set canvas
and align the set canvas as a single control with the prompt and
entry field.
The dialog looks like this:
The following sections describe how to create, start, process, and end the dialog window.
As mentioned in the previous section, the Text... choice on the pull-down menu causes a dialog window to display. It does this by calling the AHelloWindow::editText member function, as shown in the following code from the ahellow4.cpp file:
    case MI_TEXT:
      frame->editText();
      break;
The editText function saves the hello text string and sets the information area to indicate that the text dialog is active. The following code shows this:
  IString textValue(hello.text());
  infoArea.setInactiveText(STR_INFODLG);
new class created as an IFrameWindow derived class. The following code comes from the ahellow4.cpp: file:
ATextDialog textDialog(textValue,this);
The textValue object is passed as the current text string to the dialog.
When you create the textDialog object, the frame that represents the dialog and its components are initialized as shown in the following sample from the adialog4.cpp file:
ATextDialog :: ATextDialog(IString & textString, IWindow * ownerWnd)
             : IFrameWindow(IResourceId(WND_TEXTDIALOG)
                  ,IWindow::desktopWindow()
                  ,ownerWnd
                  ,IRectangle(29,50,313,290)
                     .moveBy(ownerWnd->rect().bottomLeft())
                  ,IWindow::synchPaint
                    |IWindow::clipSiblings
                    |IWindow::saveBits
                    |dialogBackground
                    |dialogBorder
                    |systemMenu
                    |titleBar)
               ,clientCanvas(WND_MCCANVAS,this,this)
               ,buttons(WND_STCANVAS, &clientCanvas, &clientCanvas)
               ,statText(DID_STATIC,&clientCanvas,&clientCanvas)
               ,textField( DID_ENTRY,&clientCanvas,&clientCanvas)
               ,pushButton1( DID_OK,&buttons,&buttons)
               ,pushButton2(DID_CANCEL,&buttons,&buttons)
               ,dialogCommandHandler(this)
               ,saveText(textString)
{
The IFrameWindow is initialized, in this case, with values that correspond to the dialog template. The IRectangle values approximate the size and position that would be generated from the dialog specifications. The style bits correspond to the bits that would be set by the template. Notice that dialog windows typically do not have sizing borders or minimize and maximize buttons.
Next, initialize the six controls needed for the dialog. Note that the buttons are owned by the set canvas, that the set canvas, the static text, and the entry field are owned by the multicell canvas; and that the multicell canvas is owned by the dialog window frame.
Because there are buttons in the frame, you must initialize a command handler for handling the OK and Cancel push buttons.
The saveText data member is initialized with the reference passed on the constructor. It provides the setTextFromEntryField access to the edit string.
Once you initialize the dialog window controls, you must position and set them. The following code, from the adialog4.cpp file, positions and sets the dialog window controls:
textField.setText(saveText);
textField.disableAutoScroll().enableMargin().enableTabStop();

statText.setText(DID_STATIC);

pushButton1.enableDefault().setText(IResourceId(DID_OK));
pushButton2.setText(IResourceId(DID_CANCEL));
buttons.setPackType(ISetCanvas::expanded).setMargin(ISize());
First, set the entry field. Then, set the initial text value
from the
saved text value.
You set the static text control's value from the resource file.
Set the push buttons by getting their text values from strings in the resource file and by enabling tabbing. Next, set pushButton1 as the default push button, which means that when a user presses Enter, it is the same as pushing that button on the keyboard.
You only need to turn on padding and set margins to zero for the set canvas containing the buttons. Turning on padding lets the buttons expand to fill the set canvas area.
Next you position the controls in the multicell canvas. Column 1 and rows 1-3, 5, 6, and 8-14 serve as padding to give the controls the correct spacing in the canvas. This is shown in the following code from the adialog4.cpp file:
clientCanvas.addToCell(&statText , 2, 4);
clientCanvas.addToCell(&textField, 2, 7);
clientCanvas.addToCell(&buttons,   2,15);
Finally, you position the multicell canvas in the dialog frame as the client, start the command handler for the dialog, and set the focus to the entry field. The following code, from the adialog4.cpp file, shows this:
setClient( &clientCanvas );
dialogCommandHandler.handleEventsFor(this);
textField.setFocus();
Once the textDialog has been created, editText displays and gives control to it using the AHelloWindow::showModally member function. Because the dialog window shows modally, it continues to have control until the dismiss function is called.
textDialog.showModally();
Once you give the dialog window control by the AHelloWindow::showModally function, the user can interact with the dialog in three ways. Because you set the focus to the entry field, the user's normal keystrokes are processed by the default edit handler and the entry field is edited.
Secondly, the user can use the system menu to close or move the dialog window. However, the window cannot be resized.
Finally, the user can use the Tab keys or the mouse to select a push button. Also, because you defined the OK push button as a default key, users can use the Enter key to select it. When a user presses a push button, the ADialogCommandHandler::command function processes the event. If the user presses OK, the setTextFromEntryField function is called to change the saved text value to the one edited in the text entry field. The code for this is found in the adialog4.cpp file, as follows:
ATextDialog &
  ATextDialog::setTextFromEntryField()
{
  saveText = textField.text();
  return (*this);                       //Return a reference to the frame
} /* end AHelloWindow :: setTextFromEntryField */
The dismiss function is then called with the DID_OK ID. This value is saved in the textDialog's IFrameWindow object. The dismiss function closes the window and returns control to the owner window. This is found in the adialog4.cpp file, as follows:
case DID_OK:
  frame->setTextFromEntryField();
  frame->dismiss(DID_OK);
  break;
Pressing the Cancel push button does not call the setTextFromEntryField function, but it does call the dismiss function with the DID_CANCEL value. This is found in the adialog4.cpp file, as follows:
case DID_CANCEL:
  frame->dismiss(DID_CANCEL);
  break;
The AHelloWindow::editText function can then use the textDialog.result function to determine if the user changed the text value. The information area is also reset. The following code is from the ahellow4.cpp file:
if (textDialog.result() == DID_OK)
      hello.setText(textValue);
infoArea.setInactiveText(STR_INFO);
The code for the text dialog comes from the adialog4.cpp file. The declaration and interface specifications for the ATextDialog class are contained in the adialog4.hpp file, which is included by both the ahellow4.cpp and adialog4.cpp files.
Because you create the textDialog object statically, that is, the new operator is not used to create it, the object is deleted automatically when it is no longer in scope, in this case, when the editText function is exited. Using this approach means that each time the editText function is called, a new textDialog object is created, processed, and deleted.
The following code, from the ahellow4.hpp file, defines the buttons data member as an instance of the ISetCanvas class:
  ISetCanvas
    buttons;
To make the ISetCanvas class available to the application, the ahellow4.hpp file includes the isetcv.hpp library header file, as follows:
#include <isetcv.hpp> //Include ISetCanvas Class Header
Next, the buttons data member is created as a set canvas control with the main window as the parent and owner of the control. The WND_BUTTONS constant provides the window ID for this set canvas control. The following is in ahellow4.cpp file:
,buttons(WND_BUTTONS, this, this)
The WND_BUTTONS constant is defined in ahellow4.h as follows:
#define WND_BUTTONS 0x1070 //Button Canvas Window ID
Use the setMargin and setPad member functions to set the canvas margins and pad to zero. The following code, from the ahellow4.cpp file, shows how to do this:
  leftButton.enableTabStop();
  buttons.setMargin(ISize());
  buttons.setPad(ISize());
  addExtension(&buttons, IFrameWindow::belowClient,
                (unsigned long)buttons.minimumSize().height());
Now that you have a set canvas, define two push button data members in the header file, adialog4.hpp, as shown in the following code:
   IPushButton
     pushButton1,
     pushButton2;
The adialog4.hpp file includes the ipushbut.hpp library header
file and makes the IPushButton class available to version 4. You
need the data members defined in the ahellow4.hpp file to create
three push buttons in the set canvas: Left, Center,
and Right. The
ahellow4.hpp file uses the following code to include the
ipushbut.hpp
file:
#include <ipushbut.hpp> //Include IPushButton Class Header
The following code creates a new instance of the Left
push
button control and specifies that it uses the command processing
associated with the MI_LEFT menu item attribute to align the
"Hello, World!!!" text string on the left side of the
client window. The following code comes from ahellow4.cpp:
,leftButton(MI_LEFT, &buttons, &buttons)
Other than the data member used (centerButton is used for the Center push button and rightButton is used for the Right push button), the window ID is the only difference in the code that is used to create all three push buttons. Specify the MI_CENTER menu item window ID for the Center push button and MI_RIGHT for the Right push button.
The set canvas control is identified as the owner and parent of the push button control.
The ahellow4.cpp file uses the setText member function to set text strings in each push button. Here is the code that sets the text in the Left push button:
leftButton.setText(STR_LEFTB);
Other than the data member for which the text is set (centerButton is used for the Center push button and rightButton is used for the Right push button), the only difference between this code and the code that puts text in the other two push buttons is the STR_LEFTB constant, which associates with the appropriate text string in the resource (ahellow4.rc or .wrc) file. Here are the text string associations for all three push buttons:
STR_LEFTB,  "Left"                          //String for Left Button
STR_CENTERB,"Center"                        //String for Center Button
STR_RIGHTB, "Right"                         //String for Right Button
![]()
Converting Application Resources
Using Common Dialogs
Layout Using Canvas Controls
