Style Manager is the simplest way to change the customize your HP VUE environment.
The basic Style Manager menu is:

- Color
- Workspace colors and palettes.
- Font
- Application font sizes.
- Backdrop
- Workspace backdrop patterns.
- Keyboard
- Key click volume or character repeat capability.
- Mouse
- Mouse button click settings, double-click speed, pointer acceleration,
or pointer movement threshold.
- Audio
- Beeper volume, tone, or duration.
- Screen
- Number of minutes before your screen times out or whether or not your
screen is covered and locked at time out.
- Window
- How a window acquires focus, if the window raises when it receives focus, or
where window icons are placed.
- Startup
- How your session begins and ends.

To start Style Manager, choose its control (1) in the Front Panel.
The visual elements of your screen can easily be changed with Style Manager:
- Workspace colors.
- Workspace backdrop patterns.
- Font sizes used to label windows and enter text.
- Choose Style Manager's Color button.
- Select a palette from the Palettes list.
- Choose OK.
Workspace colors come from predefined color palettes. Palettes that come with
the system are listed in the Color dialog.

- List of palettes.
- Color buttons, representing the selected palette's colors.
- Select a palette in the Color dialog.
- Double-click a color button to open the Modify dialog.
Or, click the button, then click Modify.
- Adjust the settings.
- Choose OK in the Modify dialog.
- Repeat steps 2-4 to modify another color button.
- Choose OK in the Color dialog.

- Shows the current color.
- Shows the new color as you make changes.
- Displays a pointer for you to choose a color in your workspace.
- Changes red, green, and blue values.
- Changes red, green, and blue proportions.
- Changes the color's intensity.
- Changes the color's brightness.
Grabbing a color from the workspace
- Choose Grab Color to get the grab pointer.
- Click the desired color to make it the New Color.
- Choose Add in the Color dialog.
- Type the new palette name in the New Palette Name field.
- Choose OK in the Add Palette dialog.
- Modify the palette.
- Choose OK in the Color dialog.
Adding a palette makes a copy of the currently selected palette and gives the
copy a unique name. You then create a palette by modifying the copy, thus
keeping the original palette intact.
- Select the palette from the Palettes list.
- Choose Delete.
- Choose OK in the Delete Palette dialog.
Restoring a deleted palette
- Open a File Manager showing HomeDirectory/.vue/palette.
- Rename the deleted palette from ~PaletteName.vp to
PaletteName.vp.
When you delete a palette, its name is prefixed with ~ and placed in
.vue/palettes in your home directory.
- Choose HP VUE Color Use in the Color dialog.
- Select the color use.
- Choose OK.
The change takes place the next time you log in.

Your display type and the HP VUE Color Use selection determine the number of
colors buttons that make up a palette.
While you can't use more colors than your display allows, you can limit the
amount of colors used by HP VUE by specifying a lower-valued display type.
For example, if you have a high color display and want to run a color-rich
application such as a CAD program, you could choose Low Color to lower the
amount of colors that HP VUE uses. The color difference is available for the CAD
program.
- Choose Style Manager's Font button.
- Select a font size.
- Choose OK.
Window labels and text show the new font size as applications are started.

- Switch to the workspace in which you want the backdrop.
- Choose Style Manager's Backdrop button.
- Select a backdrop.
- Choose Apply.

A backdrop is a pattern that covers the screen area underneath your windows.
A unique backdrop for each worspace adds variety and helps you to quickly
identify the workspace.
Behavior settings for system devices can be easily adjusted to fit your
preferences and needs:
- Key click volume and character repeat.
- Mouse button click settings, double-click speed, pointer acceleration, or
pointer movement threshold.
- Audio beeper volume, tone, or duration.
- Screen time outs and cover when not in use.
- Window focus, movement, and icon behavior.
- Choose Style Manager's Keyboard button.
- Select settings
- Choose OK.

- Auto Repeat:
- Have a character repeat as you hold down its key.
- Click Volume:
- Turn off key click (when at 0%) or change volume (up to 100%).
- Choose Style Manager's Mouse button.
- Select settings.
- Choose OK.
A new double-click speed takes effect the next time you log in.
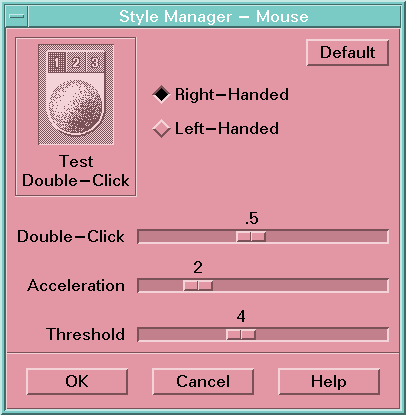
- Right-Handed:
- Use standard settings for mouse button clicks.
- Left-Handed:
- Reverse standard settings for mouse button clicks.
- Double-Click:
- Choose double-click time from .1 to 1 second. To test, double-click the
mouse image.
- Acceleration:
- Choose how fast the pointer moves across the display.
- Threshold:
- Choose the distance (in pixels) the pointer moves at a slow speed in a short
amount of time before the pointer moves at the "accelerated" rate.
- Choose Style Manager's Audio button.
- Select settings.
- Choose OK.

- Volume:
- Turn off beeper sound (at 0%) or change volume (up to 100%).
- Tone:
- Choose a beeper pitch from 82 to 9000 Hertz.
- Duration:
- Choose how long the beeper sounds from .1 to 2.5 seconds.
- Choose Style Manager's Screen button.
- Select settings.
- Choose OK.

- Screen Saver:
- Turns screen saver on or off.
- Screen Lock On Timeout:
- If screen saver is on it will lock your screen.
- Timeout:
- Specifies the time interval (from 1 to 120 minutes) from the last
pointer move or keystroke to when the screen times out.
- Full Screen Cover:
- Choose whether or not to cover your screen when Lock is used from the
Front Panel.
If you have a color display, bright colors on the screen can "burn" into
the picture tube. A time out - when the screen goes blank or is covered
prevents this from happening.
- Choose Style Manager's Window button.
- Select settings.
- Choose OK.
- Choose OK when asked to Restart the Workspace Manager.

- Focus Follows Mouse:
- Makes a window active when the mouse pointer enters it.
- Click In Window For Focus:
- Makes the window active when the mouse pointer enters the window and
you click the left mouse button.
- Raise Window With Focus:
- Brings a partially concealed window to the top when it becomes active.
- Opaque Move:
- Moves the window during a window move (instead of moving its outline first).
- Use Icon Box:
- Displays an icon box for window icons.
- Place On Desktop:
- Places window icons on the desktop.
- Choose Style Manager's Startup button.
- Select settings.
- Choose OK.
Whenever you are logged into HP VUE, your are working in a current session.
By default, when you log out, HP VUE saves your current session and restores it
the next time you log in.
You can also save a home session, a session you choose to be the one to which
you can always return, regardless of what you do during the current session.

- Resume current session:
- Starts your next session the way you left your last one, including any setting,
client, or resource modifications.
- Return to Home session:
- Starts the session that you've designated as your Home Session. If you
have never set a home session, the system default session starts.
- Ask me at Logout:
- Asks you at logout whether ot restart the current session or to
restore the home session.
- Logout Confirmation Dialog:
- When On, asks you to confirm that you want ot log out.
- Set Home Session:
- Defines a new Home Session based on your current state.
NOTE
When setting a home session, be sure to first select and save your desired
startup settings:
- Select the desired At Login settings in the Startup dialog.
- Choose OK.
- Reopen the Startup dialog, then choose Set Home Session.